Applying Permissions with MSI's Custom Actions

Microsoft has been promising for a while that they would overhaul the LockPermissions method for setting permissions within MSIs, but so far they haven’t. Until then, you might find it easiest and most dependable to use your preferred permissions-setting tools in a script that is automatically and silently launched by the MSI during the installation process. To do this, you need to create what is called a “Custom Action” in Windows Installer terminology. Without Wise or other GUI products this might be a really complicated process (just a glance at the MSI SDK docs on this subject will show you that), but Wise makes a pretty easy job of it. (The hardest part, I expect, is the scheduling aspect-see the Custom Actions section of the Tips & Tricks document for more on that.) Here I’ll demonstrate two possible programs to use in setting permissions, and how to set them up correctly with custom actions.
DACL.VBS
The first program I’ll use is Windows Scripting Host, with a script called DACL.VBS (read about and download it here). This script was written by a fellow named Tobias Oetiker and is distributed freely. It’s also fairly easy to use. Open up the DACL.VBS file in Notepad (or your favorite VBS editor), and read the help information in the comments at the top. Here’s an example which includes open permissions for entire directories, individual files, and registry keys:
DACL "Rm", "FILE://C:\Program Files\Cognos\cer1\bin\", "Users"
DACL "Add", "FILE://C:\Program Files\Cognos\cer1\bin\", "Users:C"
DACL "Rm", "FILE://C:\Program Files\Cognos\cer1\samples\", "Users"
DACL "Add", "FILE://C:\Program Files\Cognos\cer1\samples\", "Users:C"
DACL "Rm", "FILE://C:\Windows\Cognos.ini", "Users"
DACL "Add", "FILE://C:\Windows\Cognos.ini", "Users:C"
DACL "Rm", "RGY://\HKEY_LOCAL_MACHINE\SOFTWARE\Cognos\", "Users"
DACL "Add", "RGY://\HKEY_LOCAL_MACHINE\SOFTWARE\Cognos\", "Users:F"
DACL "Rm", "RGY://\HKEY_CLASSES_ROOT\.mac\", "Users"
DACL "Add", "RGY://\HKEY_CLASSES_ROOT\.mac\", "Users:F"
You’ll also need to locate the two DLLs which the script requires to run, ADSSECURITY.DLL and REGOBJ.DLL. Follow the directions in the Readme to find them and include them in your project along with the DACL.VBS script you modified for your needs. Don’t forget to set the self-register options on both DLL files!
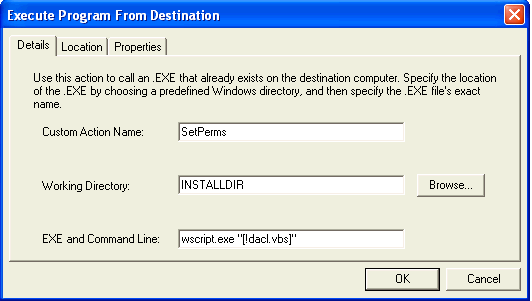
Now that your MSI is set to install those files, you need to configure the custom action to run the script at the appropriate time. In WIE, go to the MSI Script page (you’ve probably never used this before, have you?), and select “All Custom Actions” from the drop-down box labeled with “Installation Mode.” Now the list on the right side looks a little more manageable, I hope. To create your custom action, drag the words “Execute Program from Destination” from the left-side pane to the empty space on the right, and a dialog box will appear. (Note that you do not want any of the “Call VBScript from…” options.) Here you must give your custom action a name, select the directory it should run from (probably the one where you put the DACL.VBS file), and enter the command line wscript.exe “[!dacl.vbs]". This command line includes the executable WSCRIPT.EXE which should be already installed on the target system that has Windows Scripting Host (Win2k and beyond have this by default), and the Formatted syntax referring to the full path to the file object DACL.VBS. Here’s a screenshot:
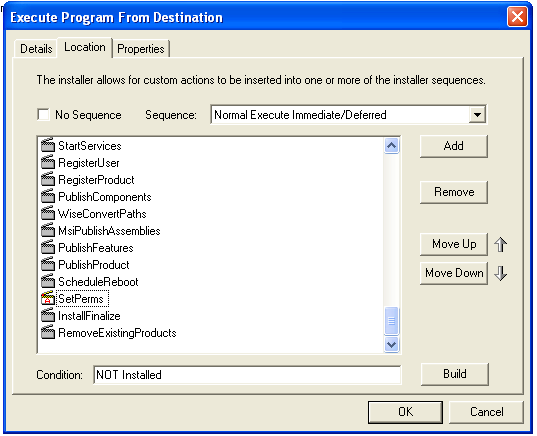
Now go to the Location tab, where we can set where this custom action will run in the installation sequence. First, un-check the box labeled “No Sequence” so that the rest of the form is no longer grayed-out. Now in the drop-down box for “Sequence,” choose “Normal Execute Immediate/Deferred”. Browse down the list until you find the item named “InstallFinalize,” then click the “Add” button to put your custom action here. Use the Up & Down buttons to move your custom action so it is the last item just before “InstallFinalize” (this is super important!). If you want to add a condition when this custom action will run or not run, you can add it here, too (for example, to have the script run only upon the first installation, enter “NOT Installed” in the Condition box at the bottom of the dialog).
Now finally go to the Properties tab to set the last couple options. For this custom action, you’ll want to use “Deferred Execution - System Context” to run the script with full privileges and “Synchronous, ignore exit code” to prevent the installation from failing when the script doesn’t returned the expected exit code (for some odd reason, WSH’s exit codes are opposite of what the shell expects for success and failure).
To understand the reasons behind scheduling your custom action in this manner, you’ll have to read up on how custom actions are run and scheduled, as there’s much more information that I’m not taking the time to explain here.
SETACL.EXE
The DACL.VBS script is not perfect nor highly configurable, but it will serve most purposes. If you want more control and advanced privilege options, you’ll have to use a command-line tool like the freeware SetACL ( old version or newer beta version).
To use SETACL.EXE, you need to create a .BAT batch file/shell script to run the command for the settings you want. Example syntax for the SetACL syntax is listed below:
SetACL.exe -on "HKEY_LOCAL_MACHINE\SOFTWARE\Classes\CLSID\{2207E830-BB6D-101A-8ECB-524153480000}" -ot reg -actn ace -ace "n:users;p:full;m:set;w:dacl" -rec yes
SetACL.exe -on "HKEY_LOCAL_MACHINE\SOFTWARE\Classes\TypeLib\{2207E82B-BB6D-101A-8ECB-524153480000}" -ot reg -actn ace -ace "n:users;p:full;m:set;w:dacl" -rec yes
SetACL.exe -on "HKEY_LOCAL_MACHINE\SOFTWARE\Attachmate\KEA!" -ot reg -actn ace -ace "n:users;p:full;m:set;w:dacl" -rec yes
Include the SETACL.EXE program and the script you just created (let’s say you named it SETPERMS.BAT) among the files your MSI installs the way you normally add files to the installation. To configure the custom action, the process is similar to that described for the DACL.VBS script, with this exception: For the command line, use cmd.exe /c “[!setperms.bat]” (change to fit your filename, and don’t forget the quotes around the [!file] box). Or, you could use the START shell command to keep the resultant window minimized, like this: cmd.exe /c start “DO NOT CLOSE” /min “[!setperms.bat]” (You could also configure your custom action with “Execute Program from Installed Files,” but this makes the scheduling more complicated, as you would want to schedule it in the Execute Immediate sequence after the InstallFinalize action. Not recommended…)
Scheduling custom actions can involve a bit of trial-and-error before you get it right, so don’t be surprised if your first attempt requires a little longer than expected. And as always, be sure to read up on what you’re working with (custom actions, scheduling, running scripts from the MSI, etc.) so you can understand it well enough to troubleshoot any problems.
Eric W. Wallace
Leadership in Systems & Software Development
System architect. Autodidact. Dad extraordinaire. A force against entropy.